AstroEditor AI Pro Review: Is It Worth Upgrading? Complete Feature Guide 2026
What Pro Users Are Achieving with Advanced Astrophotography Processing
You've probably seen them in astrophotography communities on Facebook, Reddit, or CloudyNights—those images that make you stop scrolling. Nebulae with stunning detail, galaxies that look like they came from professional observatories, and deep sky objects that make you wonder "how did they process that?"
While many factors contribute to exceptional astrophotography results, an increasing number of astrophotographers are discovering the capabilities of AstroEditor AI Pro.
While the standard version of AstroEditor AI delivers excellent one-click results for beginners, Pro users have access to advanced features that transform good astrophotos into exceptional ones. But is upgrading worth it? What exactly do you get with Pro? And who should consider making the jump?
In this comprehensive guide, we'll break down every Pro feature, show you real-world applications, and help you decide whether AstroEditor AI Pro is the right choice for your astrophotography workflow.
Understanding AstroEditor AI: Standard vs Pro
Before diving into Pro features, let's establish what you get with the standard version of AstroEditor AI.
Standard AstroEditor AI Features
The free version of AstroEditor AI includes:
- Six AI processing models (three standard, three for smart telescopes)
- Automated histogram stretching and noise reduction
- Star sharpening and color calibration
- Background extraction
- JPEG output files
- Email delivery of processed images
For beginners and casual astrophotographers, this is often more than enough. Upload your stacked FITS or TIFF file, choose a model, and receive a beautifully processed image. No complex software, no steep learning curve, no hours of manual editing.
So why upgrade to Pro?
The simple answer: control and flexibility. While standard processing delivers consistent results, Pro gives you the tools to fine-tune those results and create exactly the vision you have for your images.
AstroEditor AI Pro Features: Complete Breakdown
Let's explore each Pro feature in detail, understanding not just what it does, but why it matters for your astrophotography.
1. Advanced Stretch Control: 10 Levels Instead of 3
What It Is:
Histogram stretching is the most fundamental process in astrophotography. It takes the faint signal hidden in your data and expands it across a visible range. Standard users get three stretch levels (corresponding to our Subtle, Balanced, and Intense models). Pro users get ten distinct stretch levels.
Why It Matters:
Sometimes the perfect stretch is between "Balanced" and "Intense." Your nebula might look too subtle with one setting but over-processed with the next. Those additional seven stretch levels give you the precision to find the exact sweet spot for your data.
Think of it like adjusting the seasoning in cooking. Standard gives you "light," "medium," and "heavy." Pro gives you the full range in between, letting you dial in exactly the flavor you want.
Real-World Application:
Let's say you've captured the Andromeda Galaxy with 4 hours of integration time. The Balanced model looks good, but you're losing some of the faint outer spiral arm detail. The Intense model reveals those arms beautifully, but now the core is too bright and stars are over-sharpened.
With Pro's stretch control, you can select level 6 or 7—right between Balanced and Intense—revealing the faint arms while maintaining natural-looking cores and stars. This kind of precision is what separates good images from great ones.
Best For:
- Targets with both bright and faint features (like galaxies with bright cores and faint spiral arms)
- Nebulae with subtle gradients you want to preserve
- Images where the standard three options feel limiting
- Astrophotographers who know their data well and want exact control
2. One-Click Color and Contrast Enhancement
What It Is:
Beyond the standard AI processing, Pro adds dedicated controls for boosting saturation and contrast with a single click. These go beyond what the AI models apply by default, giving you extra punch when you want it.
Why It Matters:
Different targets and different viewing contexts demand different levels of saturation and contrast. An image destined for Instagram might benefit from bold, vivid colors that grab attention. An image for a scientific presentation might need more subtle, natural tones. Pro lets you adjust for your specific use case.
The standard AI processing aims for balanced, natural-looking results. Sometimes that's perfect. Other times, you want to push beyond "natural" to create something more dramatic or artistic.
Real-World Application:
You've processed the Orion Nebula and the AI has done a fantastic job revealing structure. But when you compare it to other Orion images online, the colors feel a bit muted. With Pro's saturation boost, you can enhance those reds and magentas to match the more vivid style popular on social media—without having to learn Photoshop curves and color adjustment layers.
Or perhaps you're working with a faint emission nebula where subtle color variations tell the story of different ionization zones. A contrast boost can make those boundaries clearer and more visually striking.
Best For:
- Social media images where you want maximum visual impact
- Bringing out subtle color variations in emission nebulae
- Creating more dramatic presentations of your data
- Matching specific aesthetic styles you've seen and admired
- Competition entries where you want your image to stand out
3. Advanced Output Filters: Starless, Monochrome, and Hubble Palette
This is where Pro gets really exciting. Output filters let you create multiple artistic and technical variations of your image instantly, each serving different purposes.
Starless Output
What It Is:
Starless processing removes stars from your image, leaving only the deep sky object (nebula, galaxy, etc.). This is accomplished through sophisticated star detection and masking algorithms that identify point sources and separate them from extended objects.
Why It Matters:
Professional astrophotographers often process stars and nebulosity separately, giving each element individual attention before recombining them. Some deep sky images just look better without the stars to distract your eyes.
Real-World Application:
You're processing the North America Nebula. It's a large emission nebula with thousands of foreground stars. Those stars, while beautiful, can distract from the nebula's intricate structure—the Gulf of Mexico, the "coast," and the detailed dark lanes.
Generate a starless version with Pro, and suddenly the nebula's structure becomes the star of the show (pun intended). You can use this for:
- Showcasing pure nebula structure in presentations
- Creating unique artistic interpretations
- Professional workflows where you'll process stars and nebulosity separately after editing with AstroEditor AI
- Educational materials highlighting nebula morphology
The starless output is also perfect for creating wallpapers or prints where you want the focus entirely on the deep sky object's structure and color.
Best For:
- Large emission nebulae (North America, Rosette, California, etc.)
- Showcasing nebula structure without star distraction
- Advanced processing workflows
- Creating unique artistic presentations
- Educational and scientific visualization
Monochrome Filter
What It Is:
Converts your processed color image to black and white, emphasizing structure, contrast, and detail without the distraction of color information.
Why It Matters:
Sometimes color can be a distraction. Monochrome images force the viewer to focus purely on form, structure, and tonal relationships. They can reveal details and patterns that get lost when our eyes are drawn to colorful regions.
Monochrome astrophotography also has a classic, timeless aesthetic. Many of the most iconic historical astronomical images are black and white, and there's something compelling about that approach even in our modern era of color imaging.
Real-World Application:
You've captured M51, the Whirlpool Galaxy. The color version is beautiful, showing the galaxy's yellowish core and bluish spiral arms. But when you convert to monochrome, something interesting happens—the spiral structure becomes even more pronounced. The intricate dust lanes stand out dramatically. The companion galaxy's tidal connection to M51 becomes more obvious.
Monochrome can be particularly powerful for:
- Galaxies where you want to emphasize spiral structure
- Planetary nebulae with complex shells
- Supernova remnants with intricate filaments
- Creating a vintage or artistic aesthetic
- Situations where your color data is limited or problematic
Best For:
- Emphasizing structure over color
- Galaxies with prominent dust lanes
- Objects with intricate filamentary structure
- Creating artistic or vintage-style presentations
- Troubleshooting images where color balance is challenging
Hubble Palette Filter
What It Is:
The Hubble Palette (also called SHO imaging) is a false-color technique that maps different wavelengths to RGB channels. Specifically, it assigns Sulfur-II to red, Hydrogen-alpha to green, and Oxygen-III to blue. This creates those iconic teal and gold nebula images you've seen from NASA's Hubble Space Telescope.
Why It Matters:
The Hubble Palette isn't just aesthetically striking—it's also scientifically meaningful. Different colors represent different ionization zones and chemical compositions within nebulae. It helps visualize the physical structure and chemistry of these objects in ways that natural color cannot.
For astrophotographers, the Hubble Palette has become an aspirational aesthetic. Those rich teals, deep reds, and golden highlights are instantly recognizable and highly shareable. This filter aims to emulate the look from your colour images.
Real-World Application:
You've imaged the Eagle Nebula (M16). In natural color, it's predominantly red with some subtle variations. Apply the Hubble Palette, and suddenly it transforms into a striking composition of teal, gold, and deep red—similar to the famous "Pillars of Creation" images.
The Hubble Palette is particularly effective for:
- Emission nebulae (the primary targets for this technique)
- Creating NASA-style presentations
- Social media posts where you want maximum visual impact
- Understanding the physical structure of nebulae
- Creating prints with bold, contemporary aesthetics
It's worth noting that traditional Hubble Palette imaging requires capturing data through narrowband filters (Ha, OIII, SII). AstroEditor AI Pro's Hubble Palette filter simulates this aesthetic from standard RGB or OSC (one-shot-color) data, giving you that iconic look even if you're not shooting narrowband.
Best For:
- Emission nebulae
- Creating striking, NASA-style imagery
- Social media and portfolio pieces
- Understanding nebula composition and structure
- Bold, contemporary aesthetic presentations
4. Professional File Export: FITS and TIFF
What It Is:
While standard users receive JPEG files, Pro users can download their processed images as FITS (Flexible Image Transport System) or TIFF (Tagged Image File Format) files. These are professional, uncompressed formats that preserve all image data and can be further edited in software like Photoshop, GIMP, or PixInsight.
Why It Matters:
JPEGs are great for sharing online, but they're compressed and "baked"—what you see is what you get. FITS and TIFF files are editable, preserving all the data from the processing so you can make additional adjustments.
This feature transforms AstroEditor AI from a standalone tool into part of a larger workflow. Use AI for the heavy lifting (stretching, noise reduction, initial processing), then export for final creative touches in your preferred software. It's also handy if you dont have a powerful PC or laptop to do the heavy lifting. Use AstroEditor AI to do all the big processing, then add the final touches from your mobile device.
Real-World Application:
You've processed an image of the Pleiades star cluster with AstroEditor AI Pro. The AI has done an excellent job with the overall processing, but you have a specific vision: you want to enhance the reflection nebulosity around the stars while slightly dimming the brightest stars to prevent them from overwhelming the composition.
Export the TIFF file, open it in Photoshop, and you can:
- Create luminosity masks to selectively enhance nebulosity
- Use star reduction techniques on the brightest stars
- Add subtle vignetting for artistic effect
- Make precise color adjustments in specific regions
- Composite multiple processed versions
The key advantage: you're starting from a professionally processed image rather than from scratch. The AI has already handled the time-consuming fundamentals, letting you focus on creative finishing touches.
Best For:
- Astrophotographers with experience in Photoshop, PixInsight or Siril
- Those building a multi-stage processing workflow
- Creating portfolio pieces that need precise final adjustments
- Learning traditional processing techniques (our training course can help)
- Situations where you want AI speed with manual fine-tuning
Technical Note:
FITS files are the standard format in professional astronomy and preserve all astronomical metadata. TIFF files are more widely compatible with consumer software. Choose FITS if you're working in PixInsight or astronomical software, TIFF if you're using Photoshop or general-purpose image editors.
5. Priority Processing: Skip the Queue
What It Is:
Pro users' images are routed to dedicated high-performance GPU clusters, bypassing the standard processing queue.
Why It Matters:
If you're processing images during peak times (evenings and weekends when many astrophotographers are working), the standard queue can have wait times. Pro users get processed immediately, often reducing wait times from minutes to seconds.
This might seem like a minor convenience, but if you're processing multiple versions of an image (trying different models, comparing settings), those time savings add up quickly. It's also valuable if you're working in the field and want quick feedback on your data before deciding whether to continue imaging a target.
Real-World Application:
It's Saturday evening and you're experimenting with processing an image of the Horsehead Nebula. You want to try the Balanced model, Intense model, and a few different stretch levels to see which works best.
As a Pro user, each iteration processes in under a minute. You can rapidly experiment and compare, finding your perfect result in 15-20 minutes of focused work.
Without priority processing, each iteration might take 15-20 minutes during peak times. The same experimentation now takes an hour or more, and the momentum and creative flow is disrupted by constant waiting.
Best For:
- Users who process multiple images regularly
- Those who like to experiment with different settings
- Astrophotographers working during peak times
- Anyone who values time efficiency
- Field processing where quick turnaround matters
Who Should Upgrade to AstroEditor AI Pro?
Now that we understand what Pro offers, let's talk about who will benefit most from upgrading.
You Should Consider Pro If You:
Want More Creative Control
If you find yourself wishing you could "just tweak this one thing" in your processed images, Pro gives you that control. The additional stretch levels, color/contrast controls, and filters let you fine-tune results to match your vision.
Process Images Regularly
If you're imaging most clear nights and processing those images, the Pro features will see regular use. Priority processing alone saves time on every single upload. For active astrophotographers, that adds up quickly.
Are Building a Portfolio
If you're creating images for social media, competitions, or personal portfolio building, Pro's advanced features help your work stand out. The output filters in particular create distinctive looks that catch attention.
Want to Learn Advanced Processing
Pro's FITS/TIFF export lets you dip your toes into advanced processing software without being overwhelmed. Start with AI processing, then experiment with additional adjustments. It's a great bridge between beginner one-click editing and full manual processing.
Use Smart Telescopes Seriously
Seestar and Dwarf users who are committed to the hobby will find Pro invaluable. Smart telescopes make capturing data easy—Pro makes processing it just as easy while giving you professional results.
Have Outgrown One-Click Editing
There comes a point in many astrophotographers' journeys where simple one-click processing feels limiting. Pro is the natural next step, giving you more control without requiring you to learn PixInsight or Photoshop immediately.
You Might Not Need Pro If You:
Are Just Starting Out
If you're brand new to astrophotography and still learning the basics of capturing images, the standard version is perfect. Focus on improving your data capture first—proper tracking, calibration frames, integration time. Once those fundamentals are solid, consider Pro.
Process Infrequently
If you only image occasionally and process a few images per month, the standard version might be sufficient. Pro's real value comes with regular use.
Are Happy with Current Results
If the standard version is giving you exactly what you want, there's no need to upgrade just because features exist. Save your money or invest it in better equipment.
Prefer Pure Simplicity
Some users genuinely prefer the simplicity of "upload, click, receive image" with no decisions to make. That's totally valid! Pro's additional options might feel like unnecessary complexity if you're happy with automated processing.
AstroEditor AI Pro Pricing and Value
Pro is available on two pricing plans:
- Monthly Subscription: £5/month
- Full access to all Pro features
- Cancel anytime, no commitment
- Perfect for trying Pro before committing
- Lifetime Access: £100 (one-time payment)
- Pay once, access Pro forever
- Best value if you know you'll use it long-term but it wont be around much longer... we only have a limited number of lifetime accounts at this price.
Is It Worth It?
Let's put this in perspective. A single night at a dark sky site might cost £5-10 in fuel. A new eyepiece costs £50-200. A quality filter costs £100-300.
For the price of a coffee each month (or the cost of a mid-range eyepiece for lifetime access), you get professional processing capabilities that would otherwise require:
- Hours of learning PixInsight or Photoshop
- Potentially hundreds in software licenses
- Significant time investment in each image
If you're serious about astrophotography as a hobby, Pro's value proposition is strong. The time savings alone justify the cost for most regular users.
Real User Results: Before and After
The photo below is a real example of a user image, edited using AstroEditor AI Pro - and it's only a couple hours of integration!
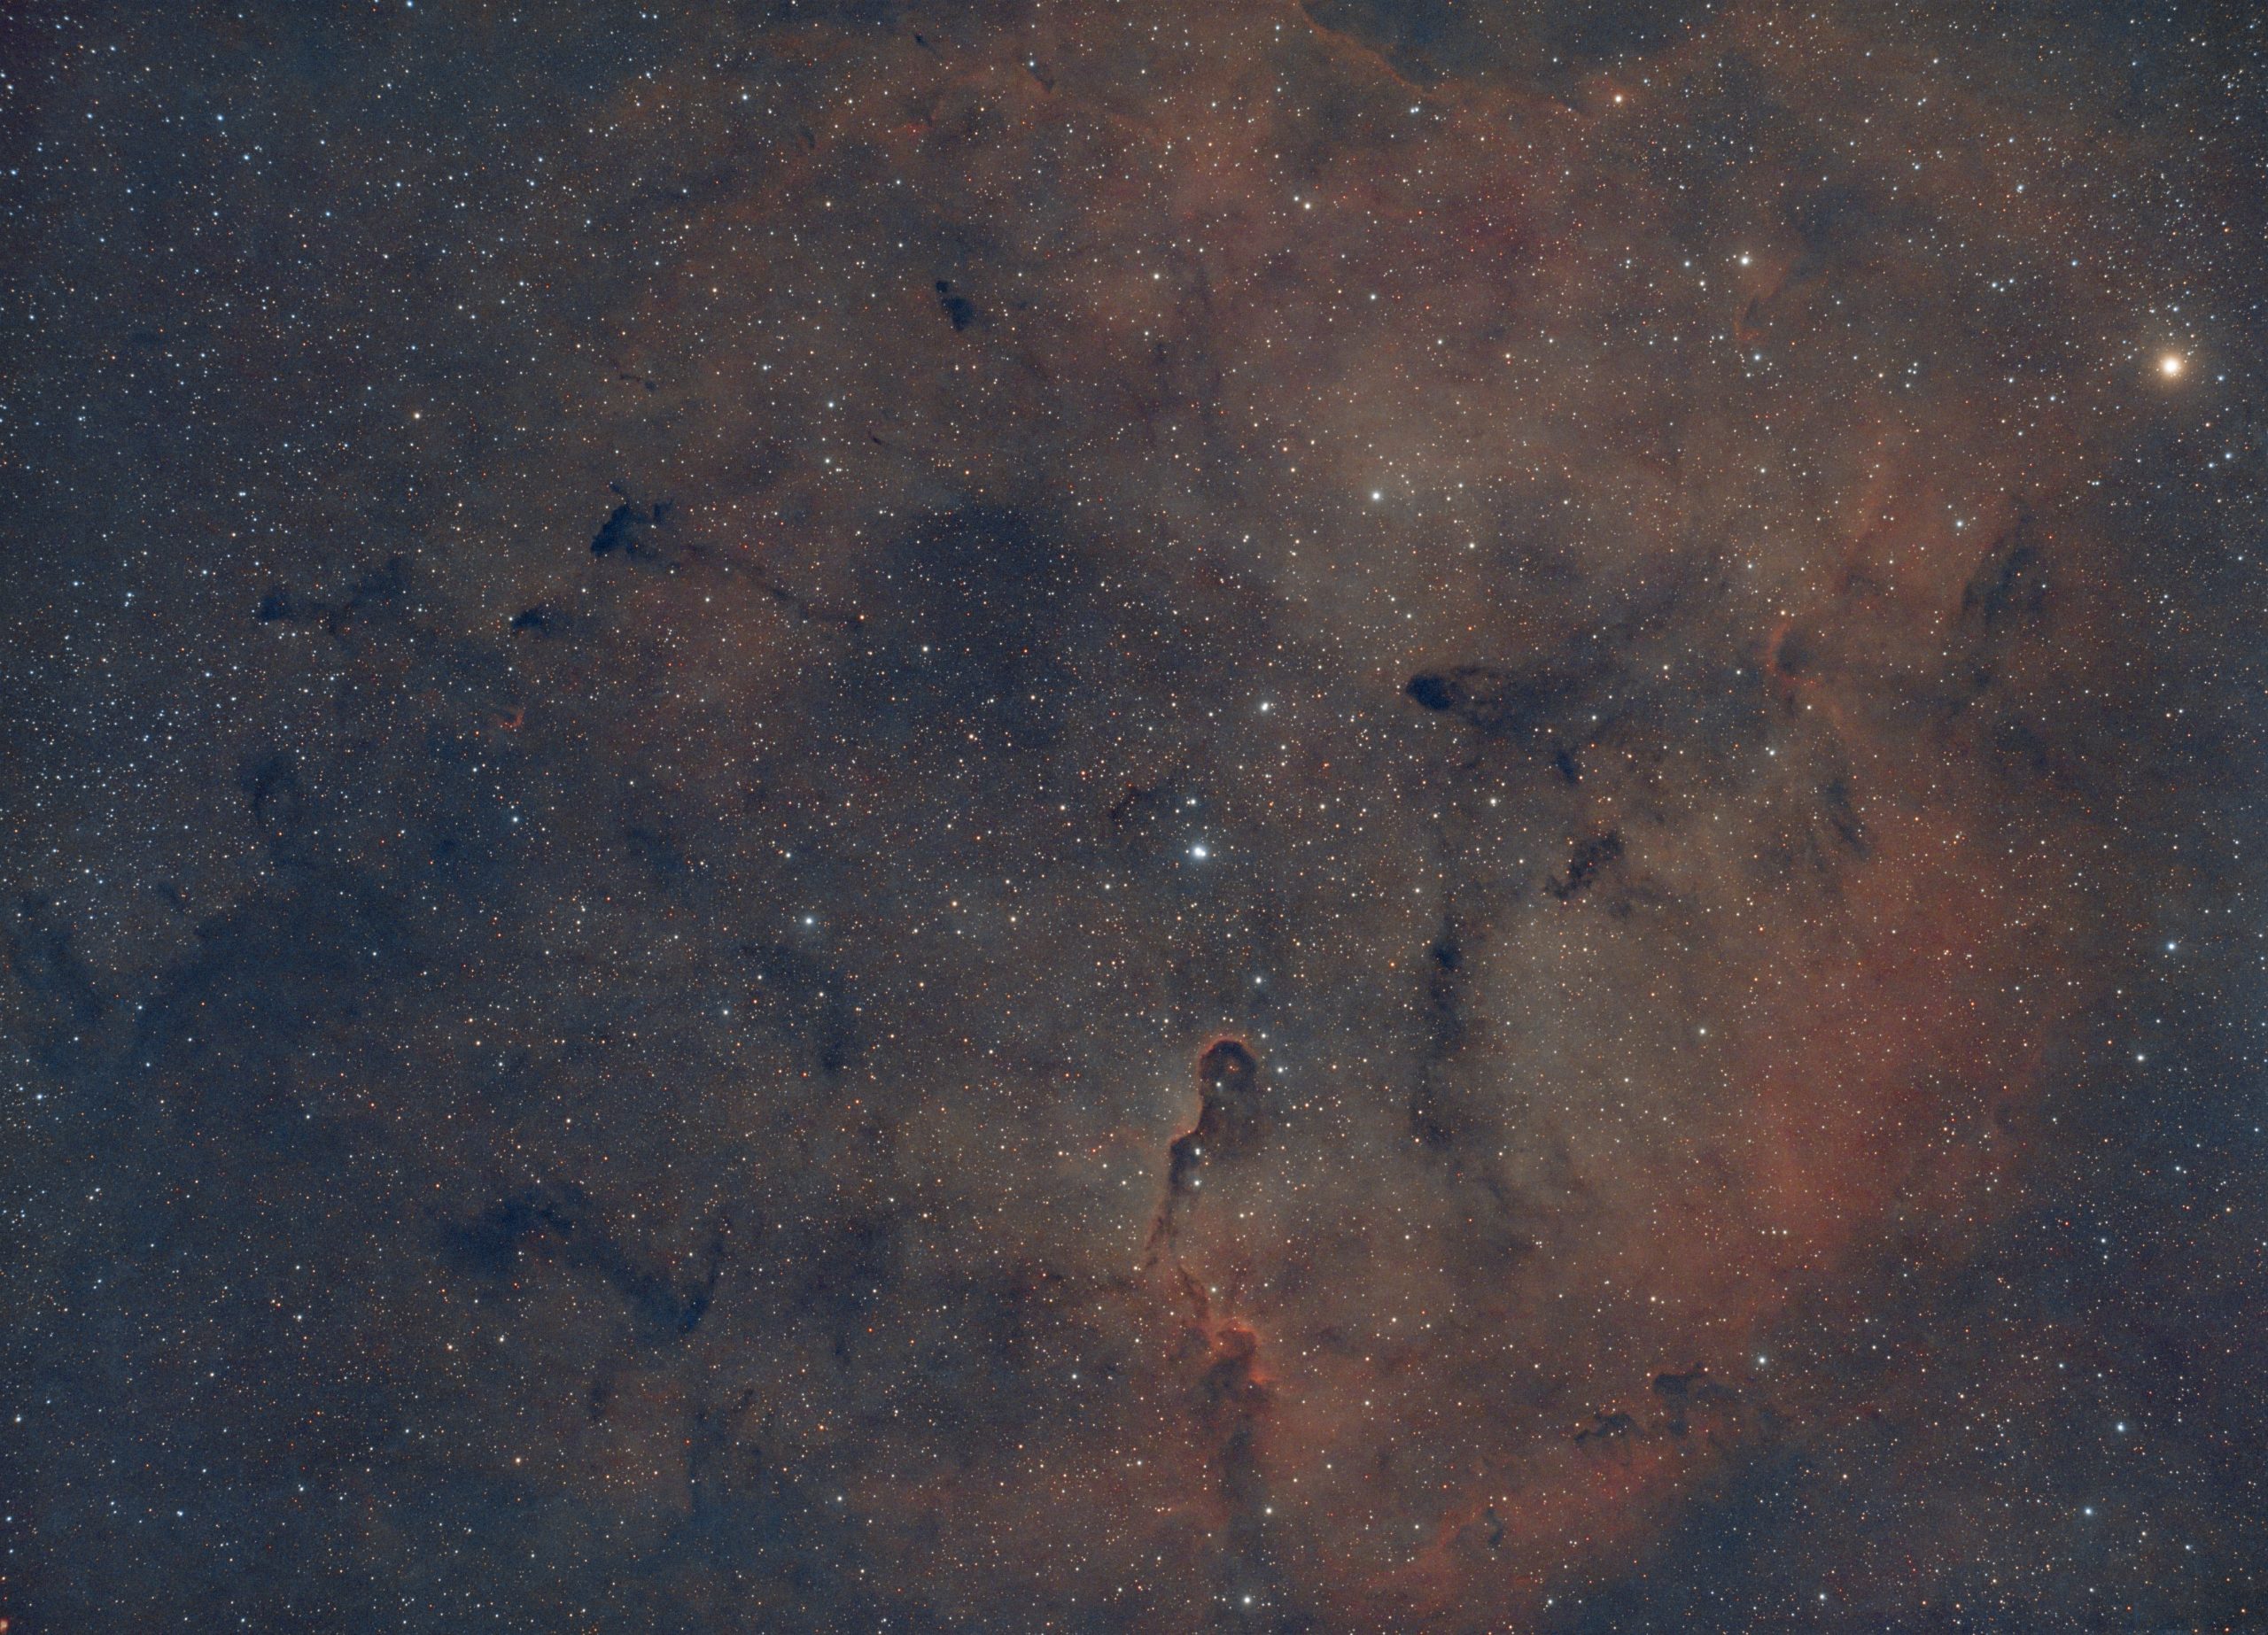
- Smart telescope users getting observatory-quality results
- Beginners producing images that look like they came from experienced astrophotographers
- Portfolio-worthy nebula images with stunning detail and color
- Galaxy images with beautifully revealed spiral structure
- Creative starless presentations that showcase nebula morphology
The common theme? Images that look professional without requiring professional-level processing skills.
How to Maximize AstroEditor AI Pro
If you decide to upgrade, here are tips for getting the most value:
Start with AI, Finish with Control
Don't feel like you need to use every Pro feature on every image. Let the AI do its thing first, then evaluate whether additional adjustments would improve the result. Sometimes the default is perfect.
Experiment with Stretch Levels
Try multiple stretch levels on the same image and compare them side by side. You'll develop an intuition for which levels work best for different types of targets and data quality.
Use Output Filters Strategically
Don't apply filters just because they exist. Think about your goal:
- Starless for showcasing structure
- Monochrome for emphasizing form
- Hubble Palette for visual impact
Each serves a specific purpose.
Export and Learn
When you export FITS or TIFF files, use them as learning opportunities. Watch YouTube tutorials about Photoshop astrophotography techniques and try applying them to your exported files. Our training course also covers advanced processing workflows.
Compare Standard vs Pro
Process the same image through standard and Pro workflows. This helps you understand exactly what you're gaining and refine your approach.
Alternatives to AstroEditor AI Pro
To be balanced, let's consider alternatives:
Manual Processing (PixInsight, Photoshop, Siril)
- Pros: Complete control, industry standard, unlimited capabilities
- Cons: Steep learning curve, expensive software, time-intensive
- Best for: Serious hobbyists willing to invest hundreds of hours learning
Other AI Tools
- Various AI astrophotography tools exist, each with different approaches
- Compare features and pricing for your specific needs
- AstroEditor AI is optimized specifically for user-friendliness
Hybrid Approach
- Use standard AstroEditor AI for quick results
- Manually process your best images in traditional software
- Pro bridges this gap, giving you AI speed with more control
Frequently Asked Questions About AstroEditor AI Pro
Can I try Pro before committing long term?
Yes! The monthly subscription at £5 lets you try Pro with no long-term commitment. Cancel anytime if it's not right for you.
Do I keep my standard features when I upgrade?
Absolutely. Pro includes everything in standard plus the additional features. You're not losing anything.
Can I downgrade if I change my mind?
Yes, monthly subscribers can cancel anytime and revert to standard features.
Will my old images work with Pro features?
Yes! You can reprocess images you've already uploaded using Pro features. Great for revisiting old favorites with new tools.
Do Pro features work with smart telescope images?
Definitely. Seestar and Dwarf users can use all Pro features with the smart telescope models.
Can I share or sell images processed with Pro?
Yes, processed images are yours to use however you like—personal, social media, prints, commercial projects, competitions, etc.
Is there a discount for annual subscriptions?
The lifetime access option (£100) is effectively a permanent "annual" discount—you pay once and have access forever.
Conclusion: Is AstroEditor AI Pro Worth It?
For most dedicated astrophotographers, yes, AstroEditor AI Pro is worth upgrading to.
If you're imaging regularly, building a portfolio, sharing on social media, or simply want more control over your final results, Pro delivers tremendous value. The combination of precision controls, creative filters, and professional export options gives you capabilities that would otherwise require expensive software and hundreds of hours of learning.
The monthly pricing makes it low-risk to try. The lifetime option makes it an excellent long-term investment if you know you'll be in this hobby for years to come.
Perhaps most importantly, Pro maintains the simplicity that makes AstroEditor AI special. You're not suddenly thrown into a complex interface with dozens of confusing options. You're getting a handful of powerful, well-designed features that enhance rather than complicate your workflow.
Ready to see what Pro can do for your astrophotography?
Upgrade to AstroEditor AI Pro and start creating images that stand out.
Already using the standard version? Try Pro for one month—at the price of a coffee, you have nothing to lose and professional-quality results to gain.
Clear skies and happy processing!
Want to learn more about astrophotography processing techniques? Check out our blog for tutorials and guides, or explore our Beginner to Pro Training course for comprehensive instruction on capturing and processing amazing astrophotos.