Does AI Add Fake Details to Astrophotography? The Truth About AI Image Processing
Understanding How AstroEditor AI Really Works
If you've been following discussions in astrophotography forums, Facebook groups, or astronomy clubs lately, you've probably encountered heated debates about AI in astrophotography. One question keeps coming up again and again:
"Does AI add fake details to my astrophotos?"
It's a legitimate concern. With generative AI tools like Midjourney, DALL-E, and ChatGPT creating images and content from scratch, it's natural to wonder whether AI astrophotography tools are doing something similar—potentially fabricating stars, nebula structures, or galaxy details that weren't actually captured by your camera.
Let's clear this up once and for all: AstroEditor AI does not add, generate, or fabricate anything in your images. Not a single pixel of fake data. Not one artificially created star. Nothing.
In this article, we'll explain exactly how AI is used in astrophotography processing, why it's fundamentally different from generative AI, and how you can trust that your processed images remain scientifically accurate representations of what your telescope captured.
The Generative AI Misconception
The confusion is understandable. When most people hear "artificial intelligence" in 2024, they think of tools that create content:
- ChatGPT writing essays from scratch
- Midjourney generating artwork from text descriptions
- AI tools that can "imagine" what a scene might look like
These are generative AI systems—they create new content based on patterns learned from training data. Tell Midjourney "create an image of the Orion Nebula" and it will generate something that looks plausible based on images it's seen before, but it's not showing you real astronomical data. It's creating a convincing fake.
This is not what happens in AI-powered astrophotography processing.
What AstroEditor AI Actually Does
AstroEditor AI is fundamentally different. Think of it not as a generative AI, but as an automated expert editor that has studied under thousands of professional astrophotographers.
Here's the crucial distinction:
- Generative AI: Creates new content from nothing
- AstroEditor AI: Analyzes your existing data and determines the best processing workflow
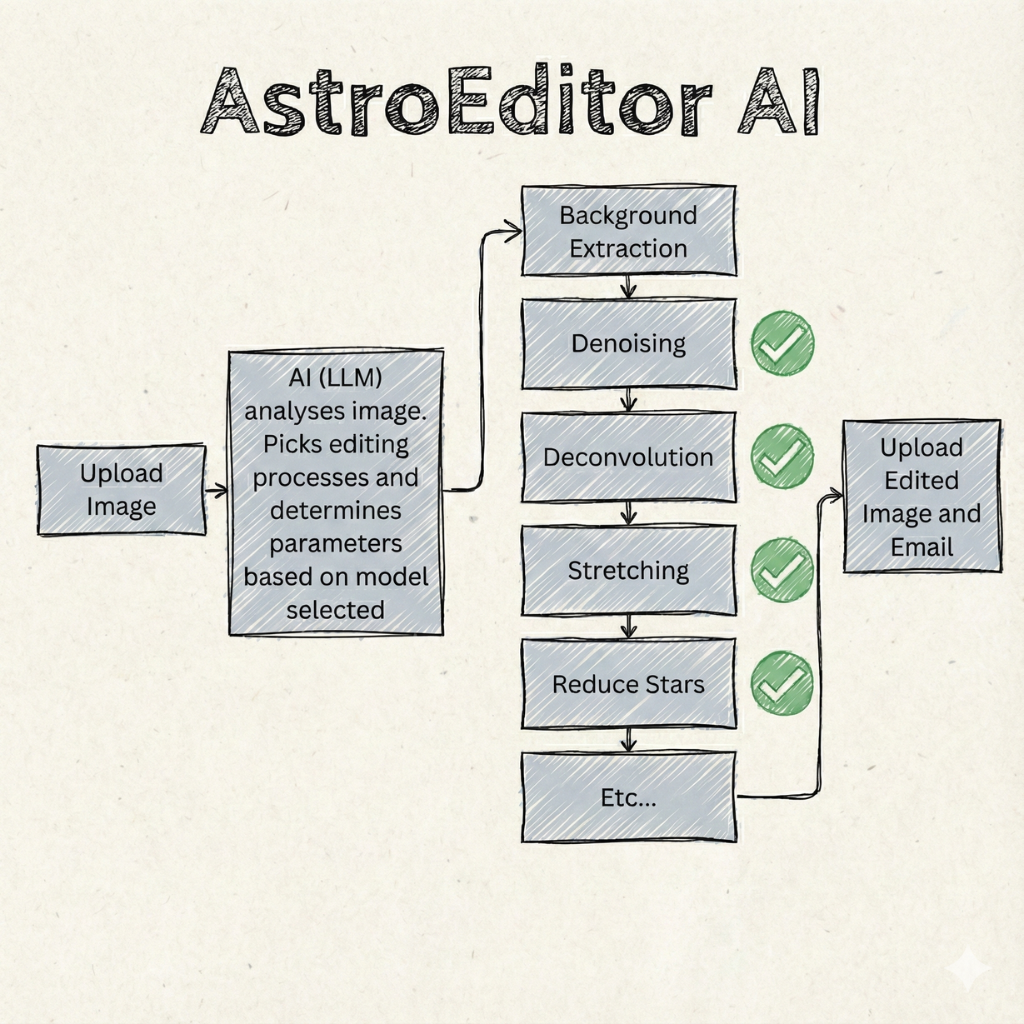
When you upload a FITS or TIFF file to AstroEditor AI, here's what actually happens:
Step 1: Image Analysis
The AI examines your image data to understand:
- What type of object you've captured (galaxy, nebula, star cluster, etc.)
- The signal-to-noise ratio in your data
- The dynamic range present in the image
- Background characteristics and gradients
- Star field density and brightness distribution
Step 2: Processing Decision Making
Based on this analysis, the AI determines:
- Which processing techniques to apply (histogram stretching, noise reduction, star sharpening, background extraction, color calibration, contrast enhancement, etc.)
- In what order to apply them (the sequence matters enormously in astrophotography processing)
- Which parameters to use for each technique (how aggressive should the stretch be? How much noise reduction? What level of star sharpening?)
Step 3: Automated Processing Execution
The AI then executes this processing chain, applying standard astrophotography editing techniques in the optimal order with parameters tuned specifically for your image.
Notice what's missing from this workflow: There's no step where anything is added or generated.
Every single photon of light that hit your camera sensor is still represented in your processed image. The AI is simply revealing what was already captured, not inventing new details.
The Human Editor Analogy
To understand this better, imagine you hired an expert astrophotographer to process your image manually using PixInsight or Photoshop. They would:
- Look at your image and assess what it needs
- Decide which tools and techniques to use
- Apply those techniques in a specific order
- Adjust parameters based on the results
- Deliver you a processed image
At no point would they be "adding" details that weren't in your original data. They'd be stretching histograms to reveal faint signal, reducing noise to make structures more visible, sharpening stars to make them crisper—but always working with the data you captured.
AstroEditor AI does exactly the same thing. It's learned from watching expert editors process thousands of images, understanding the patterns of which techniques work best for different types of astronomical targets and data quality levels.
The only difference? It can make these decisions in seconds rather than the hours it might take a human editor.
Why This Matters for Scientific Accuracy
This distinction isn't just semantic—it's fundamentally important for the integrity of astrophotography.
Astrophotography sits at the intersection of art and science. While we want our images to look beautiful, they should also be accurate representations of celestial objects. Adding fabricated details would compromise this scientific accuracy.
Traditional processing techniques used by professionals—and replicated by AstroEditor AI—are designed to:
- Reveal signal that's hidden in noise, not create new signal
- Enhance contrast between structures, not invent structures
- Reduce noise while preserving detail, not smooth over real data
- Calibrate colors to match reality, not create false colors (unless you specifically choose artistic filters)
Professional astrophotographers have been using these techniques for decades. They're well-established methods that reveal what was actually captured without fabricating details.
Common Processing Techniques Explained
Let's break down what's actually happening during AI processing:
Histogram Stretching
This is the most fundamental astrophotography processing step. Your raw stacked image contains faint signal, but most of it is compressed into a narrow range of brightness values. Stretching expands this range, making faint nebulosity and galaxy structures visible. Nothing is added—the signal was always there, just too dim to see until stretched.
Noise Reduction
Random sensor noise obscures fine details in your image. Noise reduction algorithms distinguish between random noise patterns and consistent signal patterns, reducing the former while preserving the latter. Real details remain—noise is removed, revealing the actual signal underneath.
Star Sharpening
Atmospheric turbulence, tracking imperfections, and optical effects can make stars appear slightly bloated. Sharpening algorithms restore stars to tighter points. Your stars remain your stars—they're just restored to how they would appear with perfect imaging conditions.
Background Extraction
Light pollution, moonlight, and gradients can create uneven backgrounds. Background extraction removes these artifacts, leaving a clean, neutral background. The objects remain untouched—only the unwanted background artifacts are removed.
Every one of these techniques is standard in astrophotography processing. You'll find them in PixInsight, Photoshop tutorials, and our astrophotography training course. The AI simply automates the decision-making process of when and how to apply them.
What About Those Amazing Results?
You might be thinking: "But I've seen images processed by AI that show details that weren't visible in my original file. How is that not adding details?"
Great question. Here's what's really happening:
Your stacked FITS or TIFF file contains far more information than what you can see when you first open it. Most of that data is compressed into the darkest values of the image—scientifically present, but visually imperceptible until properly processed.
Think of it like this: imagine someone gave you a book written in invisible ink. The words are there, chemically present on the page, but you can't read them. When you apply the correct light or heat to reveal the text, you're not creating new words—you're making visible what was always there.
That's what's happening when AstroEditor AI reveals stunning details in your astrophotos. The faint outer spiral arms of a galaxy, the delicate filaments in a nebula, the subtle color variations in star clouds—all of this information was captured by your camera. It just needs proper processing to become visible.
The Importance of Quality Input Data
This is also why we emphasize the importance of proper integration time and stacking in our emails and guides. AI can only reveal what your sensor actually captured.
If you upload a single 30-second exposure, there's very little signal hidden in the data. No amount of AI processing can create the detail that simply wasn't captured. But if you upload a properly stacked image with several hours of integration time and proper calibration frames, you've captured tremendous amounts of signal—and AI processing can reveal all of it.
Quality input = Quality output. This principle applies whether you're processing with AI or manually in PixInsight. The difference is that AI makes getting quality output much faster and easier.
Smart Telescope Models: Tailored AI Processing
This learning approach also explains why we developed separate AI models specifically for smart telescopes like Seestar and Dwarf.
Smart telescopes have unique imaging characteristics:
- Different sensor properties
- Specific noise patterns
- Built-in processing that affects the raw data
- Particular optical characteristics
By training AI models specifically on smart telescope data, we've taught the AI to recognize and optimize for these unique characteristics. The result? Better processing outcomes for Seestar and Dwarf users.
But again—nothing is being added. We're just applying processing techniques that are optimally tuned for the specific characteristics of smart telescope imaging.
Comparing AI Processing to Manual Processing
If you have experience with PixInsight, Photoshop, or other astrophotography processing software, you can verify this yourself.
Try this experiment:
- Process one of your images manually using your preferred software
- Process the same image using AstroEditor AI
- Compare the results
You'll notice that both versions show the same structures, the same stars, the same features. The AI version might look different stylistically (perhaps more or less aggressive in certain areas), but you won't find the AI "invented" features that don't appear in your manual processing.
That's because both approaches are working with the same underlying data and applying variations of the same processing techniques. The AI just makes different decisions about parameters and sequencing—but it's not creating content that wasn't there.
What About AstroEditor AI Pro Features?
AstroEditor AI Pro adds advanced features like starless imaging and Hubble palette filters. Does this involve generating fake data?
Absolutely not. Let's look at what these features actually do:
Starless Imaging
This feature separates stars from nebulosity, allowing you to process each element independently. It's analyzing your image to distinguish between point sources (stars) and extended objects (nebulae, galaxies). It's not creating or removing actual data—it's performing sophisticated masking based on characteristics already present in your image. Professional astrophotographers have been using similar star reduction techniques manually for years.
Hubble Palette and Color Filters
These artistic filters remap the colors in your image to create different visual representations. For example, the Hubble Palette assigns specific wavelengths to different color channels to create that classic NASA space telescope look. The underlying data remains unchanged—only the color mapping is altered. You can apply and remove these filters freely because they're not modifying your actual image data, just how it's displayed.
Manual Controls
Pro users get access to manual controls for cropping, stretching levels, saturation, and contrast. These give you direct control over processing parameters—the same kind of control you'd have in traditional editing software. Again, these are standard processing adjustments that reveal what's in your data rather than adding new content.
Addressing Specific Concerns
Let's tackle some specific concerns we've heard from the astrophotography community:
"AI might hallucinate details like ChatGPT hallucinates facts"
This comparison misunderstands the different types of AI. ChatGPT is a large language model designed to generate text. AstroEditor AI is an image processing decision engine. It's not trying to predict what should be in your image—it's analyzing what is in your image and determining how to process it. There's no "hallucination" mechanism in image processing AI like we see in text generation.
"How do I know the AI isn't adding stars or nebula structures?"
The simplest verification: compare your processed image to your original stacked file. Every feature visible in the processed version will have a corresponding (if faint) feature in the original. You can verify this by extreme stretching of your original file manually—you'll see the same structures, just with more noise and less refinement.
"This seems too good to be true—there must be some catch"
The "catch" is simply that you still need good input data. AI processing can't rescue a fundamentally underexposed image with minimal integration time. But given quality stacked data with proper calibration frames, AI can absolutely produce results that rival or exceed what you might achieve with hours of manual processing. That's not magic—it's the power of automated expert decision-making applied consistently.
The Ethics of AI in Astrophotography
This discussion touches on an important ethical consideration in astrophotography: authenticity.
The astrophotography community values authenticity. Images are expected to represent what was actually captured, even if they're heavily processed for aesthetic purposes. This is why image competitions have strict rules about what processing is allowed, and why transparency about processing techniques is valued.
AstroEditor AI aligns with these values. Because it only applies standard processing techniques to reveal captured data, images processed with AI are just as authentic as those processed manually. You're not "cheating" by using AI—you're simply using an efficient tool to accomplish the same processing goals you could achieve manually given enough time and expertise. That being said, please check the rules for any competitons you may wish to enter. They can be strictly for images edited by yourself.
In fact, our training course teaches many of the same techniques that our AI applies automatically. The goal is to help you understand what's happening to your images, whether you're processing with AI or learning to do it manually.
The Future of AI in Astrophotography
As AI technology continues to evolve, we'll see even more sophisticated processing capabilities. But the fundamental principle will remain: AI should enhance and reveal captured data, never fabricate it.
Future developments we're exploring include:
- Even better noise reduction that preserves finer details
- More sophisticated background extraction for challenging light pollution scenarios
- Improved color calibration
- Support for narrowband images
All of these represent improvements in revealing what was captured, not generating what wasn't.
How to Get Started with Confidence
If you've been hesitant to try AI processing because of concerns about authenticity, we hope this article has reassured you.
Here's how to get started:
- Make sure you're working with properly stacked FITS or TIFF files (not JPEGs)
- Upload your image to AstroEditor AI
- Choose a model that matches your imaging setup (standard models for traditional setups, smart telescope models for Seestar/Dwarf)
- Let the AI process your image
- Compare the result to your original file—you'll see the same features, just revealed and enhanced
If you want more control over the processing, upgrade to Pro for manual adjustments, advanced filters, and the ability to export FITS/TIFF files for further processing in your preferred software.
Conclusion: Trust the Process
The bottom line is simple: AstroEditor AI processes your astrophotography images using standard techniques that reveal captured data without adding fabricated details.
Every photon your sensor recorded is represented in your processed image. Every star, every nebula wisp, every galaxy spiral arm is real—captured by your equipment, revealed by intelligent processing.
The AI's role is to make expert-level processing decisions automatically, saving you hours of manual work while delivering results that honor the data you carefully captured under the stars.
Your data. Your image. Just expertly processed.
Ready to see what's really hiding in your astrophotos? Try AstroEditor AI today and discover the details you captured without worrying about artificial fabrication.
Have questions about AI processing or want to learn more about astrophotography techniques? Check out our blog for more articles or explore our Beginner to Pro Training course to master the art and science of astrophotography processing.
Frequently Asked Questions
Does AstroEditor AI add stars to my images?
No. Every star in your processed image was captured by your camera. The AI may make stars sharper or more visible through processing, but it never adds stars that weren't there.
Can I use AI-processed images in astronomy competitions?
Yes, as long as the competition allows processed images. AI processing uses the same standard techniques as manual processing. Always check specific competition rules, but AI processing generally falls under accepted processing methods.
How is this different from AI image generators?
AI image generators create new content from scratch. AstroEditor AI analyzes your existing data and applies processing techniques to reveal it. It's an automated editor, not a content generator.
Will my processed images be scientifically accurate?
Yes. The processing reveals data that was captured by your sensor. Scientific accuracy is preserved because no data is fabricated—only revealed, enhanced, and calibrated.
What if I want to verify the AI didn't add details?
Compare your processed image to your original stacked file. Every feature in the processed version will have a corresponding (though fainter) feature in the original. You can verify this by heavily stretching your original file manually.